|
I practice yoga most mornings before I eat breakfast and get to work, and a few weeks ago, I was sitting in my comfortable seat, just beginning my practice, when my mind wandered to knitting, as it pretty much always does no matter how I try to meditate mindfully. I thought I wanted to make a lace shawl, but maybe not a triangle, maybe a crescent, and it should have a lace edging, but be somewhat easy, so the body of the shawl could be garter stitch, and it could be worked all at once, end to end, so there would be no need to pick up stitches or sew any seams. I continued my practice to the end, but quickly went stash diving as soon as I finished. I found this lovely Hazel Knits DK Lively, grabbed my Heirloom Lace book, and cast on immediately. I didn't even swatch, which is pretty out of character for me. The shawl looked exactly how I wanted it to on the first try, and I didn't rip it out even once (not counting going back a row or two when I wasn't paying attention to the lace pattern.) The name, Flow is in honor both of my yoga practice which inspired the design, but also the process of designing and knitting it, which was quick and smooth in a way that almost never happens.

Even though I just finished writing the pattern a few weeks ago, I really wanted to take the design to Vogue Knitting Live Seattle with me to show off at the Hazel Knits booth, so I called for testers and set a ridiculously tight deadline. Amazingly, I got six volunteers who all finished three days ahead of the deadline! I have to give a special shout-out to them here for their careful knitting, excellent communication, and super-hero-like speed at completing the test. I am in awe. (Be sure to check out their gorgeous projects on Ravelry.)
This shawl is designed for DK weight yarn, but one of my testers worked it in fingering weight, and another worked it in worsted weight, and both were thrilled with the results. It's one of those patterns that could really be worked in any yarn and still be beautiful.
The shawl is large and can really wrap around an give a lot of cozy warmth. It was about freezing the day of this photo shoot, but I wanted it to have a springtime feel to it, so I went with bare arms. My hands were, of course, ice cubes, but I enjoyed the parts of the shoot where I got to wrap the shawl all the way around me. Delicious wool.
The lace pattern is worked on both right and wrong sides, and so requires a bit of attention, but I found that I got into a really nice rhythm once I got going, and the shaping is very simple increasing and decreasing. The pattern even has reminders on the charted and written lace instructions when it's time to work the shaping so you don't get so caught up in the lace pattern you forget to decrease.
I think that this is a pretty quick knit for a large shawl, and it's a really versatile piece that can be worn with a dress or wrapped scarf-like with casual wear.
Pattern Info
Finished Measurements
Length end-to-end: 70.5 in/179 cm
Width at widest point: 19 in/48 cm
Yarn
710 yd/650 m DK weight yarn
Color: Nickel; 3 skeins
Gauge
19 sts/30 rows = 4 in/10 cm in Garter Stitch
Needles & Notions
* Needle sizes are recommendations only. Always use needle size necessary to obtain gauge.
US #8/5.00 mm needles
tapestry needle
place markers
Skills
working lace using charted or written instructions, increasing and decreasing, working lace on both right and wrong sides
It's very good to say that it's time for some warm weather knitting! Despite my Cowichan-inspired sweater project, I'm definitely getting in the mood for light weight yarn with a little luxury and a lot of cheery color. And of course, lace! Happily, Knitscene Summer 2013 is here, ready to oblige! This issue is full of lovely summer knitting that makes me need some cute knitted tops - I'm especially fond of the Longboard Pullover by Amanda Bell and the Lida Top by Gretchen Ronnevik. You'll also find a new lace shawl called Calico in there, and that one is by me!
 |
| Copyright Knitscene/Harper |
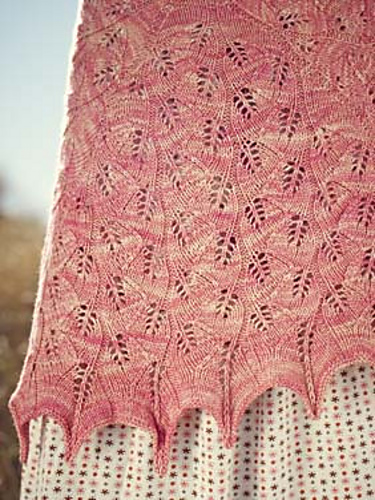
The shawl is worked in an all-over lace pattern and has a somewhat traditional feel to it, but with a few unexpected and subtle surprises. It's worked from the center-out like most triangle shawls, but instead of using a triangular shape, I opted for three equal triangles, which together wrap gracefully and generously around the shoulders, and create a gentle curve around the back/center section. I wanted the focus to be on the graphic nature of the lace, so instead of using yarn overs for my increases, I used lifted increases. That way the lace panels are separated only by delicate purl columns rather than more lace.
 |
| Copyright Knitscene/Harper |
The lace pattern repeats are just slightly asymmetrical, a subtle feature that creates a feeling of directional movement, especially at the edging. The lace is worked on both right and wrong sides, and the edging continues the body lace pattern to fluttering, draping points.
 |
| Copyright Knitscene/Harper |
I like lots of colors, especially bright ones. But I'm very particular about pinks. It has to be just the right shade of pink, either tempered by the slightest bit of yellow and orange, or intensely dark and bright for me to be impressed. When Wendee of Hazel Knits first showed me Bloom, I fell in love. It's just right. It has a very feminine sweetness to it without being at all precious. It's kind of peachy, but very decidedly pink. When the color is applied to the Divine Merino/Cashmere/Silk base, the shine and exquisite softness makes it even more lovely.
 |
Photo Copyright Hazel Knits
|
The magazine is now available for download, or if you prefer print, you can pre-order your copy. You can see the pattern on Ravelry and on the Hazel Knits blog.
Pattern Info
Finished Measurements
50 in/127 cm wide at upper edge and 20 in/51 cm tall
Yarn
(75% superwash merino, 15% cashmere, 10% silk; 400 yd 366 m/115 g):
Color #271 Bloom, 2 skeins
Gauge
22 sts and 26 rows = 4 in/10 cm in lace pattern, after blocking
Needles & Notions
Size US #6/4 mm 24 in/61 cm and 60 in/152.5 cm circular needles
markers
tapestry needle
Skills
lace on both right and wrong sides using charted instructions, lifted increase, picking up stitches
Last fall I had the opportunity to meet the delightful Sylvia Olsen, Vancouver Island native and writer of lots of books, including Working with Wool: A Coast Salish Legacy & the Cowichan Sweater. She asked me if I might be interested in doing some sample knitting for her, and I said yes, as I long as I could take my payment in wool and instruction on traditional Salish knitting. (Ever since I moved here I've felt compelled to try making my own Cowichan-inspired sweater.) Fortunately for me, she agreed. So she spun me a sweater's worth of this amazingly lofty and light single-ply. It's a blend of many breeds, and the mixing of short and long fibers helps to create a yarn that is bulky, but not heavy; you can tear it apart easily with your hands, but once it's knitted up, the resulting fabric is very durable. The yarn isn't available commercially, but Salish Fusion, a company run by Sylvia's kids, sells beautiful sweaters and accessories made with it. (Check out their incredible knitting bags especially.)

The main color ball is definitely bigger than my head, which, as you can see, makes me smile.
(Those boots are my husband's - I put them on because they were by the door and I wasn't expecting my feet to be in the photograph, but it's kind of a great look, right?)
My plan is to knit a pullover with pockets. I've already learned (and modified) the Cowichan way of doing color work, and now I have to decide which color patterns I want to use. I plan to stick with geometric patterns because I like that look better than eagles and other animals. (Geometric patterns are also more traditional than the animal motifs. A lot of the patterns you see on sweaters are based on early weaving and basket motifs.)
I'm really excited to play with the construction, which is always seamless, and includes a very clever kind of shawl collar worked in garter stitch in two parts. The shoulders are joined using a three-needle-bind off, and I've seen many that were worked with the "seam" showing on the outside, a design touch I love. The sleeves can either be picked up from the armholes and worked down, or knit separately and then attached by crochet hook. I think I'll go top-down because I like the idea of just weaving in my ends and being done, and I like being able to adjust sleeve length as I go.
Because this yarn is so unique, and because this is such a big learning experience for me, the sweater I knit will be one-of-a-kind, and I don't plan to write a pattern for it. However, if I like the process and the end product enough, I may source a more available yarn and make a pattern inspired by this sweater. I'll also be documenting my progress here, so you can follow along and see how it goes for me.
We're starting to have some sunny days here, though it's still fairly cold. It's been fun taking advantage of the sunshine though, to ride some places we haven't been before. Recently my fella and I decided we'd try to find a new beach. It reminded me of the kind of exploring I used to do as a kid in the jungle. We didn't have a particular place we wanted to go, but we did want to find something interesting. After a short ride through some nearby neighborhoods, we came across a sign that said, "Beach Access" and there was a grassy trail. So we took the trail, and it soon turned into more of a mountain biking path. We stayed on our bikes, moving along pretty slowly (neither of our bikes are mountain bikes) for a little while, but eventually had to get off and walk. Then we came to this:
Which led to this:
We were being adventurous, so we just carried our bikes down. I figured that a beach that was so hard to get to must be beautiful. We didn't know how far we'd feel like wandering, so we locked our bikes up and just enjoyed the scenery.
Once it's sunny and warm, I think we'll get out and have lots of these exploratory adventures. When it was time to go home, I feel proud to say, I carried my bike back up the stairs, and rode up some hills afterward too.
I'm working on knitting some samples and testing two new patterns that will be debuted at Vogue Knitting Live Seattle, so I hope to see some of you there!
My pants are knitted and ready for me to wear!
Yesterday I went on a bike ride to test them out and get a few pics, and I completely love them. The color is probably darker than I would have used if I was making a sample (lighter colors photograph better), but for me to just wear, it's perfect. They've got just enough nuance to look really interesting and set off the bright colors that I like to wear for the rest of my wardrobe.
Maybe I'll make my next pair in a bolder color like Lichen or Jam Session.
I did modify my own pattern a tiny bit for these. I wanted a slightly lower rise fit, so I worked the increases in the hip section every six rounds instead of every 8. That worked perfectly so that the waistband sits just above my hips.
Some info that I stated in an earlier post, but might be nice to have here with the finished object as well: I made the XS size. My low waist circumference is about 26 in/66 cm, giving me about 3.5 in/9 cm of negative ease. (The recommended is 3-5 in/7.5-13 cm.) Because my elastic is really stretchy, I cut it to 24 in/61 cm, which is 2 in/5 cm less than my low waist measurement instead of the suggested 1 in/2.5 cm. In order to decide to do this, I just held the elastic around my waist and tried pulling it over my hips at a few different lengths.
These felt really great on my bike. I forgot I was wearing them for a while because it just felt like any of my other jersey knit wool leggings.
Project Roundup:
Pattern: Kalaloch
Size Knit: XS
Yarn: Hazel Knits DK Lively in Portobello; just under 3 skeins used
Needles: US#4/3.5 mm Addi Lace Clicks
Mods: Increase every sixth round instead of every eight at hips for a lower rise fit
Our Knit Along is still going strong, so feel free to join us and knit your own pants!
One thing I've enjoyed about the Woodsmoke & Ash blog tour is that I've gotten a chance to explore and share some of the more in-depth ideas and techniques in my design process. Ann Weaver asked me to write about modifying mens patterns to fit women; on the Hazel Knits blog I got to describe one of my favorite toe-up sock finishing techniques (a whip stitched hemmed cuff), and this week I get to go on and on about stitch patterns and why they matter not only to the appearance of a finished object, but also to its functionality. It's a topic I find endlessly fascinating, so head on over to the Bicitoro blog to add to the discussion. I'm super curious what other people think about stitch pattern choices, and if you comment, you could win a copy of the book!
While you're there, check out the rest of the blog, especially if you have any interest in sewing, crafts, bicycles, or all three.
PS. I finished knitting my Kalaloch leggings in Hazel Knits DK Lively and they're blocking now! I'll share pictures as soon as they're dry. Plus, don't forget you can come see them in person at Vogue Knitting Live Seattle in the Hazel Knits booth.
Today the Woodsmoke & Ash blog tour stops at the Hazel Knits blog with a focus on Resin.
It's a DK weight sock pattern worked from the toe up in an engaging geometric stitch pattern. One of the design elements I love about the pattern is the hemmed cuff. It creates a very neat edge, and allows you to finish off the sock without binding off at all. Head over the the Hazel Knits blog for a tutorial on how to flawlessly whip stitch your hem without binding off, and a chance to win a copy of the book.
Using the tutorial as an excuse, I knit myself a sock (the size 7.5 in/19 cm fits me perfectly) and would love some company in making the second one. If you're interested in a KAL, leave a comment in the Woodsmoke & Ash thread in my Ravelry group.
It's funny how I've managed to make pants knitting a real professional priority - it's like I really want these pants or something. I little bit ago I gave you a tutorial on how to work a crochet provisional cast on directly onto a knitting needle. Today I've got a tutorial on how to remove that provisional cast on (the paranoid way!) and then knit your elastic into the hem. I've also got a couple little notes about my own progress. This is a pretty long one, but I figured that once you've got that provisional hem pulled out, you'll really want to go ahead and knit in your hem.
Find the end of your provisional cast on with the chained stitches. This is the end to begin unraveling.
Un-do the last stitch so that you have an open loop.
Gently tug on the loop and unravel the chain. If your waste yarn is drawn through the first stitch, just pull it out and place that stitch on your needle
Insert your needle from back to front into the next held stitch and then tug on your waste yarn to pull out that crochet stitch.
Here's what it looks like to have a few live stitches on the needle.
To help open up the stitch that I want to insert into next, I hold the next open loop firmly between my left thumb and middle finger, then pull it away from the work. That makes the stitch below much more visible so it's easy to insert my needle.
When all of your stitches are live and on your needle, it's time to knit in your hem or graft those live stitches using Kitchener stitch.
If you're working on Kalaloch, you'll need to prepare your elastic before knitting in the hem. Here's what my elastic waistband looks like:
I'm knitting the XS size. My low waist circumference is about 26 in/66 cm, giving me about 3.5 in/9 cm of negative ease. Because my elastic is really stretchy, I cut it to 24 in/61 cm, which is 2 in/5 cm less than my low waist measurement instead of the suggested 1 in/2.5 cm. In order to decide to do this, I just held the elastic around my waist and tried pulling it over my hips at a few different lengths. After cutting it, I just overlapped the ends by 1 in/2.5 cm and sewed it in. I'm terrible at sewing, so it isn't very pretty, but it'll be hidden out of sight, so I don't need to worry about that as long as it's very secure.
Then I placed the elastic band in between the layers of my waistband, which is folded at the turning round.
Now I'm ready to knit the hem together with the elastic band tucked inside. You might notice that blue cord sticking out - my second needle (the gold Addi Lace one) is much longer than the waistband circumference, but in this case that doesn't matter at all because I'll only be using the silver needles behind (Addi Clicks) to do the knitting. So if you're short on needles, the second one that you remove the provisional cast on with can be extra long.
To knit the hem together, insert your right needle into one stitch from the front needle and one stitch from the back needle.
Wrap your yarn around your right hand needle and draw it through both stitches.
After you've knit the stitches together, you'll have just one needle full of stitches on the right hand needle.
Once you've gone all the way around, your hem is complete and that elastic is tucked away. Isn't it so neat? (Did I mention I love knitted-in hems?) Now you're at the center back of your leggings and ready to start knitting the seat with those wonderful cables.
Any questions? Anybody do this differently than me? And isn't my Portobello just gorgeous? (Wait till you see it with cables in it!)
|
|
|


